If you've ever needed to fade a song to fit a time limit or your choreography, the OS X program GarageBand has some great features that make it really easy to do.
GarageBand's was made for recording music or making podcasts, but we are going to use it to end a song early and fade it out. This is one of the easiest and simplest edits to do.
For those who want technical nitty gritty: I'm using GarageBand '11 (version 6.0.4) on my MacBook Pro, which is running OS X Lion.
Give me a shoutout in the comments if you found this video helpful or informative - I'd like to do a series of videos showing more complicated edits. Would you be interested in that?
Video transcript and more tips (not included in the video) after the jump:
Hi, this is Cait from the Dance Buzz and today I'll be showing you how to use the program GarageBand to cut and fade a piece of music.
 |
| TIP: If you don't see music, make sure the Audio button is highlighted on the top of the panel. |
When your new project opens, GarageBand defaults to the grand piano, which we won't be using, so you can close this little keyboard window. Now we're going to bring in our music track from iTunes. Click the media button on the bottom right to show your iTunes library.
Search for your song by typing the name or artist in this box below.
 |
| TIP: You can search by just song title by dropping down the search button. |
Before I start editing, I like to clean up my window. We won't be using the piano track so we can delete it by clicking on it and going to Track, Delete Track. Close the iTunes panel by clicking the media button again. Turn off the metronome noises and change the LCD display from measures to minutes and seconds which is more useful to us.
We need to see the volume control for the track which you drop down by clicking this little arrow on the track. You will see a blue line below your track - that is your volume.
The orange rectangle is your song. Scroll horizontally until you reach the section you'd like to fade out. For this song, we are going to edit it to around 1 minute and 15 seconds.

This is where I want my song to end. Pause the playback by hitting the space bar or clicking the play button.
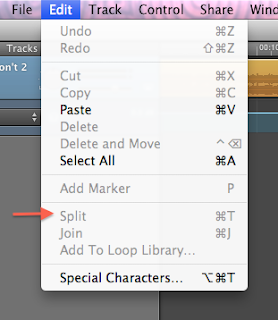
We need to delete the rest of the song since we won't be needing it. Make sure the track is selected then click Edit -> Split or Command+T. You have split the song into two pieces.
TIP: If the Split command in the menu is grayed out (see picture) that means you didn't select any track. Go back and click on your song and then try to split it.
Once it's split, click on the part of the song you don't want and press delete.
This is what the end of our song sounds like now.
Let's fix that by adding a fade.
Click on the volume line where you want the fade to start. You will see a little dot. Click on the volume line where you want the fade to end. Drag it down to create the fade. Let's check it out.
To change how long the fade is, move the second dot closer or further from the first dot. Let's make it fade faster now.
To finish, save your project and export your new track to iTunes. Select Share - Send Song To iTunes. Click share and your edited song will start to export and will start playing in iTunes when it's finished.
Congratulations! You're all set!
Thanks for watching - I hope to continue doing these series for more complicated music editing. Yay!

And I used this one too. (I did the most complicated stuff first because it was the scariest, haha!)
ReplyDelete